Welcome to Star Struck Gaming’s Resident Evil 2 Remake walkthrough part 2. The Raccoon City nightmare isn’t getting any more eye-pleasing, so this guide is here to help you see Leon and Claire through the nightmare. We’ll include items and weapons along the journey so you can collect them as you play. Part 2 of our guide is in place to cover the Resident Evil 2 Remake Police Station – the first explorable area of the game.
Already finished part 1? Check out our Resident Evil 2 Remake Tyrant tactics guide.
Resident Evil 2 Remake walkthrough part 2 – make for the Police Station

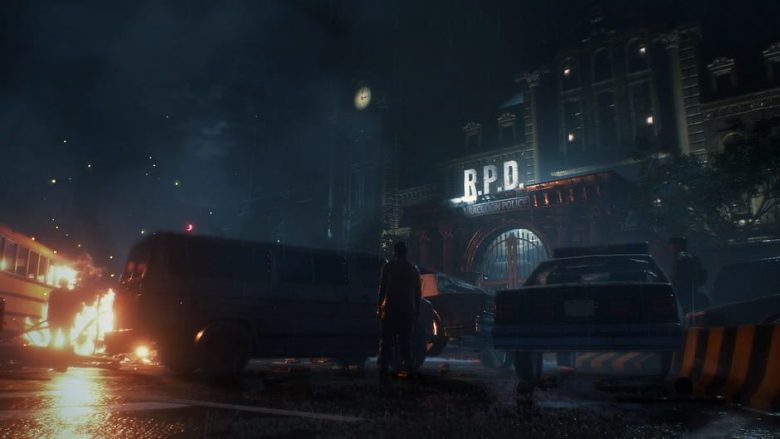
Once you’ve scraped past the terrors that reside in the Gas station, Claire Redfield and her new found buddy Leon Kennedy head to the Police Station in Raccoon City to see what’s been going on. Obviously this plan won’t pan out as easily as they’d hoped.
As you begin to have the police department in your sights, Claire and Leon’s new found bond is snatched away due to an un-predictive threat appears out of nowhere. The pair promise to rendezvous back at the Police station.

Once the cutscenes end you’ll get control of Leon, and as you do zombies will head towards you so you’ll want to head the opposite way to them. you shouldn’t need to get too close and personal with these zombies as they’re fairly spaced out.
Weave your way in between the police cars and you’ll spot an alleyway that has a streetlamp to the left of the ally, head down the ally in the direction of the fire. You’ll find a zombie sat down that will start to rise up, dart towards the stairs while she’s still getting up and navigate right to find the area in front of the police department.


Resident Evil 2 Remake walkthrough part 2 – Your first exploration
The first area you head into will be the Main hall, which is pretty quiet as there’s not much happening in terms of living people. Feel free to check out the area, but you’ll just find some barred doors and empty beds. Down the steps towards the front desk will find you a First aid spray sat on the right atop a green box, in addition to Handgun Ammo on the front desk.

Check to the rear of the desk to find an item box, this is where you can both collect bonus items you’ve earned as well as ditch items you don’t need right now. When you find the Spade Key (and other keys) you will see a check mark appear on it within your inventory, at which point it’s served its purpose and can be placed into storage.


Resident Evil 2 Remake walkthrough part 2 – Explore the East Side
Make your way back to the Main Floor, and looking to the left you’ll see a ”Keep Out” message on a shutter-type door – interact with and pull the lever on the left of the shutter. The door will now open marginally and you will need to interact to crawl underneath it.

The East Hall is where you’ll end up, full of overflowed water and blood. Head down the stairs and an empty fuse box will be on your left, while a locked door to the East Office is also the first you’ll encounter here. Take a right-turn further down the corridor and pass the door covered in boards near the snack machines, you’ll see an off-balance cabinet and more importantly a door next to it.
Make your way into the press room and head to the wall which has a red switch on it, interact with the switch and then find yourself some handgun ammo. The body here won’t be going anywhere.
After you’re done go back to the East hall and interact with the cabinet to move it, make a left turn after you pass the cabinet to find the toilets. A First aid Spray is sat in the cubicle that hasn’t been boarded up.

Going back into the East hall, ignore the East office door with the chains for now and instead make your way to the Watchman’s room.

Resident Evil 2 Remake walkthrough part 2 – Back to the Main Hall
There won’t be much of the officer left once you’re done, but at least you’ll grab the Officer’s Notebook file – this has some scribbles of a possible escape route with statue drawings. This isn’t a bad time to get back to enjoying the salvation of the Main hall.

As you trek back you’ll be lucky enough to run into a body that was still breathing, with an undead police guard behind the door awaiting a snack. Feed him some head bullets until he falls, run away and a window will have yet another zombie tumbling through at you.

Make your way down the corridor, and at least three zombies will be lingering around the closet next to the vending machines towards the end of the corridor. Have a pop at these with your handgun as there’s a strong possibility they’ll grab you for a taste if you run past them, once at least one goes down keep moving.

Should you be feeling keen to take out the other zombies, there is some more Handgun Ammo and Wooden Boards stashed in the closet they came out of.
Now head towards the shutter door, interact and a zombie will try and grasp your leg – fortunately a guardian angel saves you from going through what the officer did moments ago. The saviour in question is Lieutenant Marvin Branagh, who is already suffering from wounds himself but appears to be the very last person in this zombie-ridden structure.

Resident Evil 2 Remake walkthrough part 2 – Find a Way to Get Underground
Lieutenant Marvin reckons that the notebook given to you may be your one hope to escaping this place, but do to so you will need to find three medallions to be placed into the statue that we first noticed in the Police Station. In addition, Marvin will provide you with a handy knife – this will allow you to use this alongside your primary weapon to slice enemies away if they latch onto you.
Knifes are great except for the fact they have limited uses, as it’s used it will become more blunt with each slice. After you kill an enemy though you can retrieve it. If a zombie starts giving it groans after you’ve downed them, you can use your knife to make sure they stay down for goof.

it’s time to leave Marvin to complain about his injuries, and hunt for the three Medallions you need. check out the Officer’s Notebook which will show a woman holding a vase, a unicorn statue and a lion statue. Fortunately you’ve only to head up to the second floor to grab the first one.
Resident Evil 2 Remake walkthrough part 2 – Obtain the Lion Medallion
Head up to the second floor and have your notebook handy, you need to interact with the statue and align the emblems as follows: Starting from the left is a lion, a leafy branch, and finally a bird. Once you have done this a little hatch will open which contains the Lion Medallion – take it!
Resident Evil 2 Remake walkthrough part 2 – Find the Unicorn Medallion
Head back downstairs to the storage box and free up some inventory space, stash the Lion medallion for now. Alternatively place the Lion Medallion in the statue near Marvin if you want to get rid completely.


 Locker 106 hold the Roll film: Commemorative, with Locker 109 offering some more Handgun Ammo. A keycard is necessary to get the shotgun at the room footer, you don’t have this right now and it’s not too tricky to obtain. After polishing off any remaining zombies head opposite to the west office room.Here you’ll find a zombie slumped over his desk, which is one you’ll want to headshot as he’s been waiting for your entrance. On the far side of the office there’s another zombie for you to take care of. Clear up any more undead and then check out the table that has a Uses of Gunpowder file with some Gunpowder sitting next to it.

Resident Evil 2 Remake walkthrough part 2***it’s worth taking note of the use of Gunpowder. Collect two gunpowder items and combine them to create Handgun ammo. Combine High Grade gunpowder with a standard gunpowder to create Shotgun shells. Magnum ammo meanwhile requires the combination of two High Grade Gunpowder items. It’s always worth keeping some in the item box as a backup, you can then strategically combine ammo as you need it dependent on your weapon.
Handgun ammo is located in the locker just behind you, while a locked safe resides in the little office just off the main area.

If you hear a very faint noise, almost like a rattle, there’s a toy in the Northern wall of the room atop a cabinet. In order to unlock an nonperishable combat knife (for your next playthrough) you’ll need to find and shoot each of these 15 Mr raccoon toy collectables. At the furthest end of this same area you’ll find a locked desk, Leon’s desk to be specific. On top you’ll find a Rookie’s First assignment file, which in a nutshell involves you using your colleague’s names to unlock the padlocks on the desk.


Once you get the sequence right the Portable Safe will unlock, providing a spare part – examine this to find it’s actually the Spare key you need to use in the Safety Deposit Room.

If you’ve headed to the Safety Deposit Room to use the key, you can either place it onto the keypad position 2 for Gunpowder and shotgun shells, or position three for a combat knife.
Head out of the Locker Room and make your way upstairs to the Third floor. There’s a box with handgun ammo laying around, with a door locked with a dial towards the end of the corridor. You will also find a crumbled wall, follow this into a room to find the Spade key. The second floor door near the Waiting Room can now be unlocked, as well as the door in the Main Hall.

There’s just one door here, make your way through into a corridor to see something shuffle past the window. Don’t worry too much about this just yet – just make your way down the corridor to find a note that bears some importance – To any Survivors File.

Next up in this same hallway will be a door that directs you to the West Storage room, pretty rank looking to say the least. As you enter the room, you’ll find a scary doll with some wooden boards nearby, as well as some handgun ammo just by the entrance.
There’s some bars at the end of the room, check this out and you’ll see what looks like another of the officer’s notebook statues. There’s a barricade blocking the path which you can ignore for now, but you’ll find a Hi Pouch sitting on a nearby table which will increase the space in your inventory.
The some Guys Scribble File will also be perched near to this, probably giving you an idea why there’s so many corpses in the room. Handgun ammo will also be stashed along the left wall, and after collecting this you can head through the door taking you to the library.
Looking down from above you’ll see what’s below you, with a lingering zombie and an additional one munching a corpse. Near the exit is a third zombie waiting for you. If you decide to dash across the landing Leon will fall victim to a weak floor and fall below – getting surrounded by undead. Instead take note of Marvin’s message asking for you to come back to the main hall, taking the staircase or the ladder is the safer option here.

Feel free to down the zombies, but in doing so it’ll cost you bullets that you could save by slowly sneaking past the sleeping one and the one munching. You can grab a Combat knife from the officer’s corpse that lies at the foot of the staircase. If you’re feeling brave, interact with the movable bookshelves, move the left one to find some handgun ammo hidden at the rear.

Make sure to collect the Red Book on the table near the exit, as you’re going to need this later.
It’s tempting to head through the spade Door here, but before doing so head to the bottom of the staircase through to the lounge. The Unicorn statue is here, which you can refernce in the Officer’s Notebook.
Examine the Notebook to find that the three symbols required for the Unicorn Statue is a Fish, Scorpion and vase (left to right). Enter this combination and you will recive the Unicorn Emblem That’s two of the three emblems you need for the statue in the Main hall!
Before leaving make sure to collect the Police station map – Upper floors which will reveal all of the areas of the second and third floors.

It’s now time to make your way through the Spade door which leads to the Main hall by using the Spade kewy you’ve obtained. Ascend the staircase and towards Marvin, making you aware that your friend (Claire) is to the rear of the Police Station. He tells you that yoiu are able to reach this area by heading to the East Hall 2F – this is the next area we needed to go to use the Spade Key anyway.

Resident Evil 2 Remake walkthrough part 2 – Head to the Courtyard
Make sure if you stash any items you don’t get rid of the Red Book, the Unicorn Emblem can be put into storage or placed into the Main hall statue. Navigate your way upstairs to the waiting room, ensure you pick up the green herb (if you haven’t already) and interact with the next door to use the Spade Key – you’ll now enter the Upper east hall.

Should you have already used the spade Key on the West Office door, you’ll find that’s all of the uses for the key – so you can discard or stash it.
Once you enter the Upper east hall you’ll see some wooden boards to the North, as well as a shutter that requires a crank to prize it open. The Art Room door is unlocked so enter here to find the Art Article: The Red Stone File on a blue chair. The Weapons locker key card perches next to it, and nearby is the Commemorative photo statue which hold the Red jewel.

Collect the arm placed on the table and combine it with your red Book, interact with the statue to place the Red Book/Arm onto the statue. The opposite hand will open to provide the Scepter, examine the sceptre thoroughly and there’ll be a switch that release the Red Jewel – something that comes in useful later.

Finally someething good in our Resident Evil 2 Remake walkthrough part 2! Head back to the Safety Deposit Room by directing through the West Office, once there head to the end of the room and use the Weapons Locker Key Card for a tasty reward – the W-870 Shotgun and Shotgun Shells!

The next place to go is through the East hall again towards the windows, a helicopter will inevitably smash into the corridor further down towards the fire escape – your path to the roof is now blocked off. The only other way to go is via the Fire Escape with a green herb sat on the windowsill.
A cutscene will trigger a rendezvous with your ally (Claire if playing as Leon), unfortunately this is cut short after the helicopter goes bang to attract more undead. Following the cutscene you’ll be at the foot of the Fire escape with minimal routes to go.

You’ll find the Bolt Cutter, Handgun ammo and Wooden Boards around this small space. Use the Bolt Cutter to get through the door in front of you.

Resident Evil 2 Remake walkthrough part 2 – Find a Way to Destroy the 3rd Floor Barricade

You can now get into the East office by using the Bolt Cutters, there’ll be zombies in the small office inside as well as zombies trying to get through the windows.
Try and save your bullets or take them out, but try and keep a reserve of shotgun Shells. The table nearest the window has a Flash Grenade on it, while the table nearest the door holds a green herb. The window where the zombie crashed in has a corpse holding some Handgun Ammo too – don’t worry he’s dead.
Why not check out our Resident Evil 2 Remake safe combinations guide as you go?


Before leaving check out the whiteboard to nab a green herb, with a locker combination note for the locker in the showers (CAP). Next to the door leading out is a Flash Grenade, and in the Hall near the Record Room requiring a Hearty key are some wooden boards.
During Leon’s playthrough he will not have access to the Heart Key meaning any doors with this requirement will remain locked.
Head into the Dark room and store any items you don’t need, before moving onto the Men’s Locker Room.
Firstly open the locker with the combination CAP and grab some Shotgun Shells, and next use the Valve Handle to turn off the steam to enter the showers. Ignore the corpse as it’s a fake, grab some gunpowder from the locker and head through the door.
The first thing you’ll notice here is all of the bodies, but the issue here is the creature hiding at the end of the corridor. You’ll see something scoop down and take a corpse back up to the ceiling – we’re talking about a Licker.

Lickers may not have sight but instead rely on acute hearing to kill. Soft and slow steps are key – legging it is going to tell them exactly where you are. Head forward to the S.T.A.R.S Office in a slow fashion to avoid being attacked, if you fancy a fight get close to spray some shotgun shells to its head.
Flash grenades are a great way to disorientate Licker sense – making it falls and flap about which gives you a good shot at killing it first. Fortunately lickers are unable to open doors, so you’re safe there. As it lunges at you pop a shot to deal some decent damage and stun it.
After you sort out this pest, head inside the S.T.A.R.S Office and you’ll find a Red Herb in front of you, there’s also a battery needed for the detonator on a table near a boombox. A memo showing a safe combo below you in the West Office shows the combination Left 9, Right 15 and Left 7.

Towards the other side of the office sits a first Aid spray in a medical bag, and next to it is High Grade Gunpowder.
Next up in our Resident Evil 2 Remake walkthrough part 2; check behind some boxes to find the next Mr Raccoon Toy. Inspect the desk in the middle of the room to find a Flash Grenade and some Shotgun Shells. Teasing you at the North side of the room is the armoury holding a Lightning Hawk Magnum which you can’t get near right now. You won’t be able to use the monitor or PC yet as you need a USB Drive.

Resident Evil 2 Remake walkthrough part 2 – Obtain the Maiden Emblem
After you’ve claimed the spoils here slowly make your way out to the hall, and walk towards the linen room next to the locked door and go through to the Lounge and then to the library. Make your way to the West Office and unlock the safe using L9, R15, L7 as the combo to grab another hip pouch. Go into your inventory to combine the detonator with the battery, head back to the Library peak to the West Storage Room. Plant the detonator onto the barricade and stand well back.

You will notice the cabinet near the Library door will slant over, interact and put it upright. Get ready to deal with a zombie then head towards the Maiden Statue.
Open the Officer’s notebook and enter the emblem sequence as Woman, Bow, Snake – the third symbol will be worn so it may take a moment to check you’ve applied the right one. Take your Maiden Emblem.
Resident Evil 2 Remake walkthrough part 2 – Activate the Goddess Statue
You’ve now gathered all three of the emblems – nice work! Heads up, a Licker is now going to try and kill you after you depart the area. The best tactic here is to head right into the Library and go down the ladder quickly.


Star Struck Gaming is a participant in the Amazon Services LLC Associates Program, an affiliate advertising program designed to provide a means for sites to earn advertising fees by advertising and linking to amazon.co.uk